I started experimenting with making 1/1728
th scale houses (dollhouses for 1/144
th scale, or dollhouses for dollhouses for dollhouses) a while ago. These are some of the houses and
roomboxes I made out of paper, perched on a penny.

This house was supposed to look like my big dollhouse, though I had to simplify by removing the upper porch. The house shown in the picture below is actually a bit too big, I've since shrunk the graphics down a bit.

I could only fit four rooms inside, and I decided to make it open backed, rather than front opening like my real house.

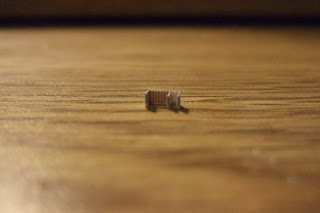
This was an attempt to copy an antique German
roombox. I can't just scale down the real graphics, because they would just turn to shapeless blobs. Instead, I recreate the main features, simplifying as much as possible.
This was one of the first houses I tried to make, so the construction is fairly simple. It's still one of my favorite houses though, perfect for the corner of a micro nursery!

Here's the inside. I used bits of laser cut paper on the roof, but I'm still looking for something a bit more delicate looking.

There are free tutorials for some of these houses
here, if anyone is interested!

 All that's left is to finish the back. I've volunteered mom for that task. I quickly stuck it into Pheobe's room with the extra fabric tucked under to get an idea of how it will look in the room when everything's done. I'm not sure that I should have used quite so much orange and I definitely made a lot of mistakes, but overall I'm happy with it.
 I love the view from our kitchen after a good snow fall! Hope everyone has a good holiday. We've certainly started celebrating around here!
 P.S. Mom made the maid a few months ago. She's one of my favorites.
 I've been playing with different ways to make small-scale plaster. In this box, I tried a putty that I had lying around. I like the effect, but it was a bit difficult to work with.
 I tried to do a bit of aging on the tapestry and carpet. The book on the table has a real leather cover, though it can't be seen now that the book is glued down. I make a whole bunch at once, and then use them as needed. I'm unhappy with the tapestry rod. I'll probably replace it with something a bit thinner and older looking.
 The picture above shows the chateau in progress, before I'd started the dormers or chimneys.


 Unfortunately, I don't have any other photos, as I sold this box on Ebay shortly after finishing it, and the better photos have since disapeared. Lots of little handmade details, including a canterbury full of sheet music (front right) and a blue and white firescreen (back left by the fireplace). The walls were covered with fine gold silk, and the carpet was fuzzy. The box was a butchered bespaq piece. The only things not made from scratch were the (heavily modified) roombox and the oval metal frame.
 This copy of Renoir's In the Meadow is probably my favorite painting. Josephine Meyers does amazing work, and the painting has a lot of


 P.S. Sorry about the picture quality. I found my camera, but the charger was not in the case for some odd reason. Two steps forward, one step back.
 There are lots of people in the hall,mostly named after favorite book characters. The little boy in the back, leaning against the banister is from The Wren's Nest. His name is Ned (Edward), after one of the characters in Louisa May Alcott's book An Old Fashioned Girl.

 This house was my attempt to make a miniature of my own dollhouse. I couldn't figure out how to make the upper porch though, so it's not quite accurate.
 This is another tiny dollhouse based on an antique dollhouse. The interior has four rooms. The roof of this house is very difficult to put together.


 As with the first screen, all the individual pictures were hand cut. None of the images are repeated more than once on a screen, though I had to reuse some pictures on all three screens.
 I've repainted the orange exterior with creams and grey-browns. I was originally going to paint tromp l'oeil stonework all over, but decided that would be too busy.
 This is the lantern for the entrance hall. The ceiling rose is an embossed medallion from a Christmas card. We've gotten some amazing embossed and laser cut cards over the years!


 I'm excited that I may be able to finish this painting. Of course I still see lots of things that need to be fixed, and large parts of the painting are still untouched, but it's going a bit faster than I expected.
 I went back in and straightened out the mouth a bit, and lowered the eyes a little (still a bit cross-eyed and eyebrow-less). The hands could use lots of work as well. I'm concentrating on the first painting for the time being though, and letting her wait a little longer.
 The Christmas tree in the corner is made from a glue covered toothpick dipped in model ship's ballast and then painted green. There are a few red and green wrapped packages, and some unwrapped toys. I carved the wooden doll (in front of the tree) from a toothpick, adapted from instructions on


.jpg)


.JPG)


+(2).jpg)


